How to implement approval in Teams using Adaptive Cards
Adaptive
Cards are self-contained user interface components that transcend platform
boundaries. Crafted in JSON format, these snippets of UI can be seamlessly
exchanged between applications.
Upon
reaching a particular application, the JSON content is dynamically rendered
into native UI elements, seamlessly blending with the app's aesthetic. This
approach facilitates the creation and seamless integration of lightweight UI
elements across diverse platforms and frameworks.
User Story:
We're
preparing to implement a leave approval workflow in Teams utilizing adaptive
cards. Employees will submit their leave requests, and line managers will
receive notifications within Teams.
Step 1 –
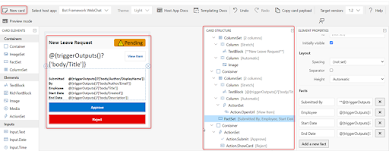
Design the Adaptive Card
Prior to
establishing the flow, let's initiate the card design process using the
designer tool to ensure readiness. Visit https://adaptivecards.io/designer/
to access the designer interface and adjust the 'host app' setting to
Microsoft Teams – Light / Dark. Once the card example is updated, we can
proceed with development.
Navigate
to https://adaptivecards.io/designer and in Card Payload Editor upload below
JSON.
{
"type": "AdaptiveCard",
"body": [
{
"type":
"Container",
"style":
"emphasis",
"items": [
{
"type":
"ColumnSet",
"columns": [
{
"type":
"Column",
"items":
[
{
"type": "TextBlock",
"size": "Large",
"weight": "Bolder",
"text":
"**New Leave Request**"
}
],
"width":
"stretch"
},
{
"type":
"Column",
"items":
[
{
"type": "Image",
"url": "https://adaptivecards.io/content/pending.png",
"altText": "Pending",
"height": "30px"
}
],
"width":
"auto"
}
]
}
],
"bleed": true
},
{
"type":
"Container",
"items": [
{
"type":
"ColumnSet",
"columns": [
{
"type":
"Column",
"items":
[
{
"type": "TextBlock",
"size": "ExtraLarge",
"text": "@{triggerOutputs()?['body/Title']}",
"wrap": true
}
],
"width":
"stretch"
},
{
"type":
"Column",
"items":
[
{
"type":
"ActionSet",
"actions": [
{
"type": "Action.OpenUrl",
"title": "View Item",
"url":
"@{triggerOutputs()?['body/{Link}']}"
}
]
}
],
"width":
"auto"
}
]
},
{
"type":
"FactSet",
"spacing":
"Large",
"facts": [
{
"title":
"Submitted By",
"value":
"**@{triggerOutputs()?['body/Author/DisplayName']}**
@{triggerOutputs()?['body/Author/Email']}"
},
{
"title":
"Employee",
"value":
"@{triggerOutputs()?['body/Title']}"
},
{
"title":
"Start Date",
"value":
"@{triggerOutputs()?['body/StateDate']}"
},
{
"title":
"End Date",
"value":
"@{triggerOutputs()?['body/EndDate']}"
}
]
}
]
},
{
"type":
"Container",
"items": [
{
"type":
"ActionSet",
"actions": [
{
"type":
"Action.Submit",
"title":
"Approve",
"style":
"positive",
"data": {
"id":
"@{triggerOutputs()?['body/ID']}",
"action": "approve"
}
},
{
"type":
"Action.ShowCard",
"title":
"Reject",
"style":
"destructive",
"card": {
"type": "AdaptiveCard",
"body": [
{
"type": "Input.Text",
"id": "RejectCommentID",
"placeholder": "Please specify an appropriate reason for
rejection.",
"isMultiline": true
}
],
"actions": [
{
"type": "Action.Submit",
"title": "Send",
"data": {
"id": "@{triggerOutputs()?['body/ID']}",
"action": "reject"
}
}
],
"$schema": "http://adaptivecards.io/schemas/adaptive-card.json"
}
}
]
}
]
}
],
"$schema":
"http://adaptivecards.io/schemas/adaptive-card.json",
"version": "1.2",
"fallbackText": "This card
requires Adaptive Cards v1.2 support to be rendered properly."
}
Step 2 – Building The Flow
To create the Flow, Go to Power Automate -> Create -> Start from Blank -> Automated Flow.
· Give an appropriate name for the Flow
and select the “When an item is created” trigger and click on Create button.
- Add “Post an Adaptive Card to Teams Channel and wait for response” action.
o
Team:
Select the Team in which you want to post the approval
o
Channel:
Select the Channel in which you want to post the approval
o
Message:
Copy the json given above and paste it in the message section and ensure the
dynamic content is copied properly, or if you have built your own adaptive card
then paste your json here and add any dynamic content as required.
o
Update
Message: Provide the update message, which will be shown after approver user
has provided the decision using the card.
o
Should
update card: Select yes here.
· Add “Condition”
action to check whether approver has approved or rejected the request, on left
hand side of the condition copy.
· body(' Postadaptivecardandwaitforaresponse')['submitActionId']
expression (without quotes) and on right hand side provide “Approve” value or
whatever your action value is defined in your adaptive card for the buttons.
· Under the “yes” branch to update the item and
send message to the employee once leave request approval or rejected, do
following.
· Finally, the navigate to SharePoint
site and create a new leave request.
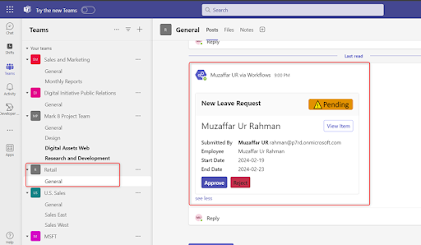
· Manger will receive message in teams
chats please refer below screen short.
· Once manager approve’ s the request
employee will receive message in teams that his leave request is approved.
Complete
Flow.
Thank you...!


Comments
Post a Comment